Primary objective of machining or metal cutting operation is to provide desired shape and quality to the workpiece by removing excess material with the help of a cutting tool. Assessing quality of a machined surface is important for judging machinability for a particular combination of work-tool material under a specific machining condition. In the context of manufacturing, three terms—surface roughness, surface finish and surface integrity are commonly used to characterize the surface quality of finished product. Differences between surface roughness surface integrity are discussed in the following sections.
What is surface roughness?
Surface roughness refers to the height of macro and micro asperities and irregularities present on a finished surface that is processed by any manufacturing process (including machining, forming, coating, etc.). There are several ways of expressing the roughness value (such as 10 point average, peak to valley, rms value, maximum roughness, etc.); however, all such methods indicate the height of the asperities and also the depth of valleys present on the final surface. The quantitative value of the surface roughness is used to indicate the level of surface finish.
It is worth mentioning in this context that surface finish is not exactly same with the surface roughness. Roughness can be expressed quantitatively and also it can be measured with the assistance of suitable instruments. Surface finish cannot be measured; it can be expressed qualitatively by means of attributes like good, poor, mirror finish, etc. However, roughness value indicates the level of finish – lower is the roughness, better is the finish (or vice versa).
What is surface integrity?
Surface integrity covers the overall surface condition of the workpiece processed by any manufacturing processes. It consists of a wider spectrum of surface characteristics that also includes surface roughness. Apart from basic topographic information about the surface, several metallurgical, mechanical and physical properties, which may be altered during manufacturing processes, also come under the preview of surface integrity. In general, surface integrity covers the following important aspects.
- Surface roughness
- Surface waviness
- Surface irregularities (macro and micro)
- Form error (flatness, circularity, etc.)
- Surface defects (visible and micro)
- Induced residual stress (tensile or compressive)
- Surface burning
- Corroded surface
- Oxidized surface
- Sub-surface defects including cracks
- Change in microstructure and crystallographic orientation
- Phase change and recrystallization
- Change in mechanical, chemical and physical properties

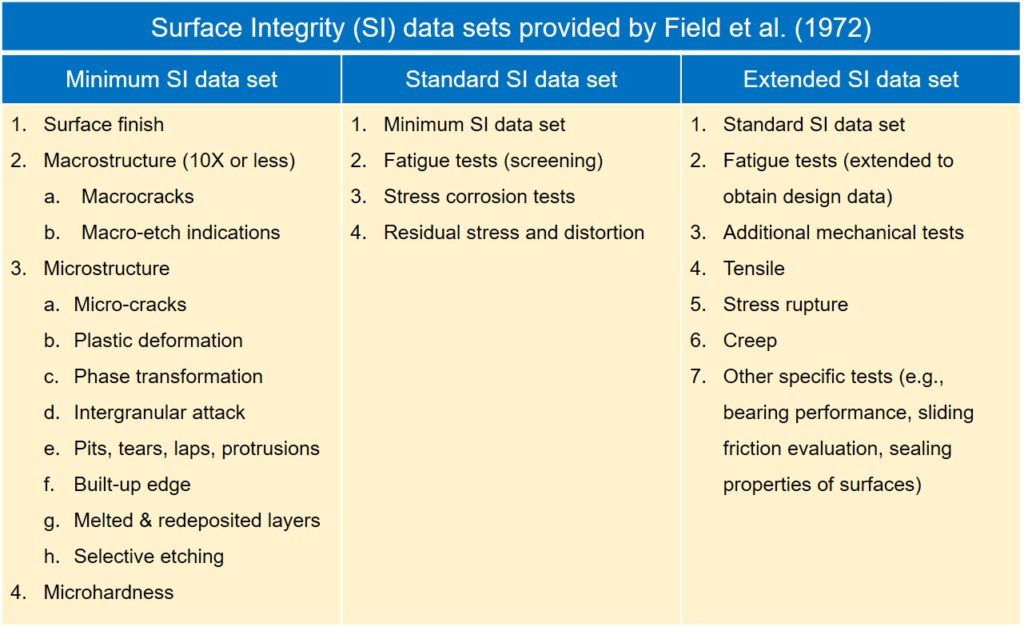
The concept of surface integrity was first introduced by Field and Kahles in 1964 in order to define the enhancement of surface condition after it is processed by any surface generation process. The standard dataset for surface integrity (SI) prepared by Field et al. (1972) as shown above. Surface finish is one important parameter in minimum surface integrity (SI) data set. Thus it can be concluded that surface integrity encompasses wider characteristics of a solid surface that are required to clearly display overall surface quality, while the surface roughness is one such parameter that come under integrity. In fact, surface finish is the most common and widely used parameter to characterize the solid surface.
References
- Quanren Zeng (2015), Surface integrity evaluation and the effect of machining-induced surface integrity characteristics on part’s performance, Ph.D. Thesis, University of Strathclyde, Glasgow, Scotland, UK.
- DeGarmo’s Materials and Processes in Manufacturing by J. T. Black and R. A. Kohser (Wiley).